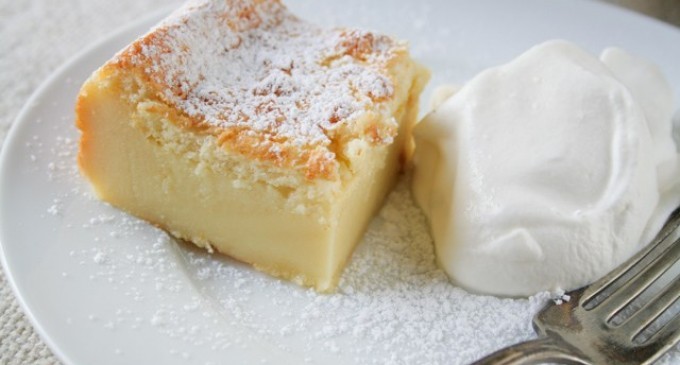
Here's that cake that I've often wondered about! And guess what? It's just the one that will make your mouth water and begging for more!
Let's Get Baking…
The Ingredients To Gather:
-
1/2 cup (113g) unsalted butter
-
2 cups (480ml) milk
-
4 eggs, separated into whites and yolks
-
4 drops white vinegar
-
1 1/4 cups (150g) confectioner’s sugar
-
1 Tablespoon (15ml) water
-
1 cup (115g) all-purpose flour
-
1 teaspoon (5ml) vanilla extract
-
extra confectioner’s sugar for dusting
-
freshly whipped cream or fruit for serving
The Step By Step Directions To Follow:
1. Preheat your oven to 325°F and lightly butter or grease an 8″x8″ baking dish. Warm up the milk to lukewarm and set aside.
2. Whip egg whites and vinegar to stiff peaks and set aside. In a separate large mixing bowl, beat egg yolks and sugar together until light. Add the melted butter and tablespoon of water to the mixture and mix until everything is fully incorporated. Next, add the flour and mix until evenly incorporated. Then mix in the milk and vanilla extract, being careful because this will be a very liquidy and wet batter.
3. Fold egg whites into the liquidy batter mixture. The whites will be a bit lumpy when you try to mix them, but do your best to incorporate them and eliminate any big chunks.
4. Pour the mix into the buttered pan, and bake for 45-60 minutes, or until the top is a deep golden brown. If the top becomes completely brown before the end of baking, cover with tin foil so that the top does not burn. If you’re not sure if the cake is done, gently shake the pan and look to see if the center jiggles. When the cake is done, the center should still have a light jiggle to it.
Finished!
You can also use fresh fruit for a garnish. I personally love to add a few strawberries to the top with the powered sugar.
Enjoy!
Article & Photo Source: In This Kitchen


Shared this recipe at: https://www.facebook.com/alotofrecipes