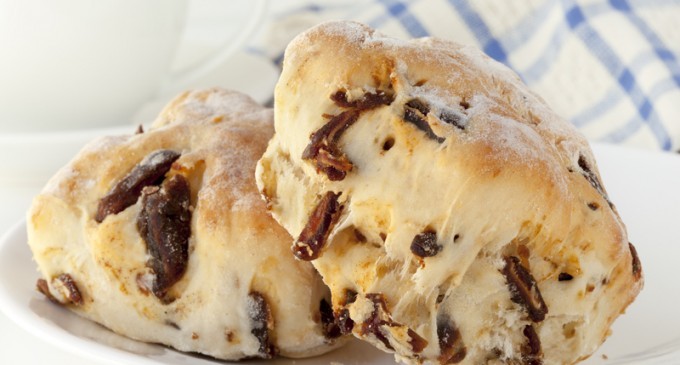
Here's everything you need for these indulgent pecan scones. Note that if you're using salted pecans, you'll need to reduce the amount of salt you add to 1/4 tsp.
Ingredients To Gather:
- 2 1/4 cups all purpose flour
- 1/2 cup packed brown sugar
- 1 Tablespoon baking powder
- 1/2 teaspoon salt
- 10 Tablespoons cold unsalted butter, cut into small pieces
- 1/2 cup toasted pecan pieces, mine were unsalted, see notes
- 1 large egg
- 1/4 cup + 2 Tablespoons or more of heavy cream
- 1 teaspoon vanilla
- 1/2 teaspoon Buttery Sweet Dough Flavor (optional)
- additional heavy cream and raw sugar for topping
For The Tasty Butterscotch Glaze:
- 6 Tablespoons brown sugar, packed
- 2 Tablespoons water
- 1 Tablespoon salted butter
- 1/2 teaspoon vanilla
- 1/2 cup powdered sugar
- pinch of salt
Directions To Follow:
Begin by preheating your oven to 400 degrees Fahrenheit and then using a whisk to combine the flour, sugar, baking powder and salt in a medium-sized mixing bowl. Add the butter by using a pastry cutter or two knives, or simply by rubbing it into the mixture with your fingers. The chunks of butter should be small — ideally no larger than a pea. The mixture should be crumbly. Next, stir in the pieces of pecan and then coat it in the flour mixture by tossing it. Next, crack an egg and pour it into a glass measuring cup, and then add cream. Stop when you fill the cup halfway. Next, add 2 tbsp. of cream. Combine it using a fork and mix until it's thoroughly blended. If you plan to use vanilla and butter flavor, this is when you should add it. Next:
Make a well in the center of flour mixture and pour in the egg/cream mixture. Toss gently with a fork until you've distributed the liquid well and mixture begins to hold together a bit. Your mixture is going to seem to be too dry, but try to resist adding more liquid. Your scones will not hold shape with too much liquid.
If necessary, use your hands to gently mix the mixture in the bowl until it comes together. This may take a minute, but as you work the butter and cream mixture, it will begin to come together. You don't want to melt the butter, so if you have hot hands, try using a large spoon or a spatula to fold the mixture onto itself in between using your hands.
Once the dough comes together with no crumbs, divide dough in half. On a lightly floured surface, pat each half of dough into a circle about 1″ thick.
If you find your dough has gotten too soft from handling, you can put the bowl back in the refrigerator before you shape it so that the butter can get firm again, or roll, cut and place on the cookie sheet, then slide it into the refrigerator or freezer for 10-20 minutes.
Using a floured sharp knife, cut each circle into 6 wedges and place on an ungreased baking sheet leaving 1-2″ of space between for spreading.
Brush with additional cream. Sprinkle with raw sugar, if you're not planning to glaze.
Bake for 12-14 minutes or until lightly golden. Allow to cool and set up for a few minutes on the baking sheet, then remove to a rack to finish cooling.
When the scones are cool, make the glaze. Place cooling rack over a sheet pan. In a small saucepan, mix the brown sugar and water together with a whisk and heat just until sugar is dissolved. Whisk in the butter until fully combined.
Remove pan from heat and whisk in vanilla and powdered sugar. (Sift your powdered sugar first if it's lumpy.) Continue whisking until smooth and any remaining lumps are completely dissolved. Taste and add a pinch of salt, if needed.
Dip the tops of each scone into the glaze then place back onto the cooling rack. Once all of the tops are glazed, go back and using a spoon or fork, drizzle each scone with additional glaze.
A delicious helping of 12 sinfully sweet scones. Keep in mind that the glaze for these scones sets quickly, so you may need to work fast. You can also stir it a few times so that it doesn't get to hard to use. We recommend serving these with a cup of hot tea or coffee, or a tall glass of cold milk!
Article Source: The Merchant Baker


Yummy
Yup :p
oh my … sure looks yummy
Tina Tow
❤️
❤️
Bailey Moran can you make these for Me? Please
I can do that!
Yay
Looking good
Yum