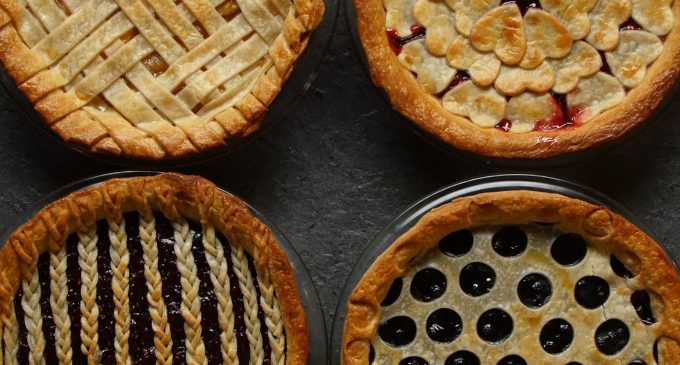
Have you ever wondered how to get your pies looking as good as they taste? Well, look no further because we have a solution for you. Here are some general pie baking guidelines you should follow.
- Using refrigerated pie crust is the easiest way to experiment with pie decorating. Roll out the dough to ⅛-inch thick, ensure to brush away any excess flour.
- Use a ruler or another straight edge to maintain straight, even lines, or use your first strip as a guide for the remaining necessary cuts.
- Make sure the pie crust is very cold, chilled from the refrigerator before working with it. Chill the pie after you are done placing your pie crust – place it in the refrigerator prior to baking for 20-30 minutes.
Ingredients for Pie Top
For Diagonal lattice:
- 1 refrigerated pie base with filling
- 1 refrigerated pie top
- Knife and kitchen shears
- Baking ruler
- Pastry brush
- Egg wash, optional
For Hearts:
- 1 refrigerated pie base with filling
- 2 refrigerated pie tops
- Heart cookie cutter
- Pastry brush
- Egg wash
For Braided:
- 1 refrigerated pie base with filling
- 1 refrigerated pie top
- Knife and kitchen shears
- Baking ruler
- Pastry brush
- Egg wash
For Honeycomb:
- 1 refrigerated pie base with filling
- 1 refrigerated pie top
- Round cookie cutter or piping tip
- Pastry brush
- Egg wash
Directions
For Diagonal lattice:
- Once your pie is prepared until the point of adding the top crust, roll out your dough until it is about an 11-inch circle.
- Using a knife and a ruler, slice up 18 strips that are ½-inch wide each.
- Lay down 3 strips parallel to each other on top of the filling, leaving about 2-3 millimeters of space between each strip. Fold back each strip, then place 3 more parallel strips diagonal to the first, creating an “X” in the center of the pie.
- Continue placing strips of dough in groups of 3 parallel to each other, folding back and forth until all strips are used. Trim the dough strips as necessary with kitchen shears or your knife.
- Brush the surface of the pie with egg wash.
- Chill pie in the refrigerator, then bake as normal.
For Hearts:
- Once your pie is prepared until the point of adding the top crust, roll out the 2 remaining pie tops. Begin cutting hearts out of both remaining pie crusts using a heart-shaped cookie cutter.
- Brush one side of the hearts with egg wash, then firmly place around the edge of the crust.
- Continue using the same method, layering each subsequent heart between the gaps in rows.
- Once entire pie is covered in hearts, brush the top with egg wash.
- Chill pie in the refrigerator, then bake as normal.
For Braided:
- Once your pie is prepared until the point of adding the top crust, roll out your dough into a thin rectangular shape. Using a ruler, slice up thin ½-centimeter wide strips (about 33-36 in total).
- To braid, take 3 strips, pinching one end of each together. Bring the side strips to the center, continuing until you reach the bottom, then pinch the other ends of each together. Continue until all the dough has been braided in 3 strip-groups.
- Place the braids on the pie, then brush with egg wash.
- Chill pie in the refrigerator, then bake as normal.
For Honeycomb:
- Roll out refrigerated pie crust as needed, then cut out circles with a round cookie cutter or piping tip. Fold the bottom crust over the top, then seal, crimping the edges.
- Brush the surface of the pie with egg wash.
- Chill pie in the refrigerator, then bake as normal.


Ashton Lowery