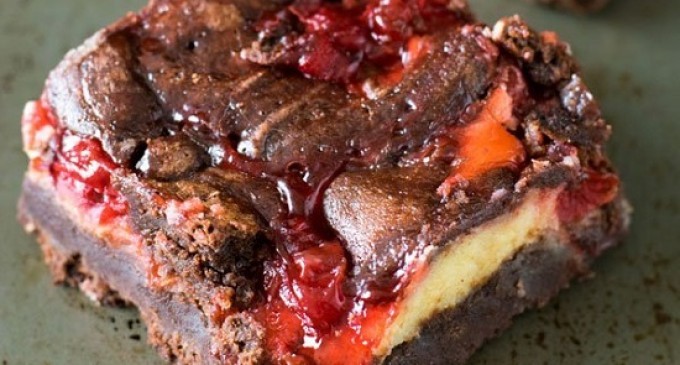
If you are not a fan of cherries and vanilla you can always substitute it for something else. The second time I made this recipe I actually used Raspberries – I found this to come out a little zestier.
Let's Get Started Making These Brownies!
What To Use:
-
1 cup semi-sweet chocolate chips
-
3/4 cup unsalted butter cut into pieces
-
4 oz unsweetened chocolate chopped
-
1 1/2 cups granulated sugar
-
3 egg
-
1 egg yolk
-
1 tsp vanilla extract
-
3/4 cup all-purpose flour
-
1/4 tsp sea salt fine
The Cheesecake Part:
-
8 oz cream cheese (1 package) room temperature
-
1 egg
-
1 tsp vanilla
-
1/2 cup sugar
-
1 can cherry pie filling
Preparation For The Brownies:
-
Preheat oven to 350 degrees F. Line a 9×13 baking dish with aluminum foil and spray with cooking spray.
-
Add the unsweetened chocolate, semi sweet chocolate, and butter to a microwave safe bowl. Heat bowl in the microwave for 1 minute, then stir generously (30 seconds – 1 minute). Continue to heat for 30 second increments until chocolate is smooth. Be careful not to burn chocolate.
-
Set chocolate aside and allow to cool for 10 minutes.
-
Using a stand mixer (or a hand mixer + large bowl), add in 3 eggs, 1 egg yolk, and sugar. Beat on medium high speed for 3 minutes, until ingredients are light and thick (like runny frosting). Add the vanilla and beat for another 30 seconds.
-
Dropping mixer speed to low, slowly pour cooled chocolate in with egg mixture and blend until combined.
-
Finish by slowly blending in flour and salt. Careful not to overmix – stop as soon as there is no longer any visible white or large clumps in the batter.
-
Set bowl aside while preparing the cream cheese
Preparation For The Cheesecake:
-
Using a stand mixer (or a hand mixer + large bowl), beat together cream cheese, egg, vanilla, and sugar on medium high speed until combined, about 2-3 minutes.
-
Set bowl aside until ready to add to baking dish
Putting It Together:
-
Pour 1/2 of the brownie mix along the bottom of the prepared baking dish. Use a spatula to spread evenly to the corners.
-
Pour the cheesecake mix on top of the brownie layer. Use a spatula or the back of a spoon so the cheesecake completely covers the chocolate.
-
Spoon cheery pie filling on top of cream cheese. There won't be enough to completely cover, so just add evenly.
-
Using large spoonfuls, add the remaining brownie batter on top of the cherries and cheesecake. The brownie mix won't fully cover the top layer – that is okay. I focused on filling in the sides and the center, then gently pulled the sections of brownie mix toward each other as best as I could. Once finished, you can also run a knife or spatula through the mix to create more decoration on the surface.
-
Bake in the oven for 50-60 minutes or until a tester inserted in the middle comes outcompletely clean.
-
Let brownies cool completely, then store in the refrigerator until ready to eat.
Finished!
The only way to explain these are 100% amazing. You have Cherry cheesecake and brownies all in one. How can you go wrong? Nothing short of simply amazing!
Article & Photo Source: Homemade Hooplah


Deilicous
share
Sharing this recipe at https://www.facebook.com/downhomecomfortfoodrecipes
yum!!
Sweet!
Safiyah Chin
Dominic
Omg make for me!