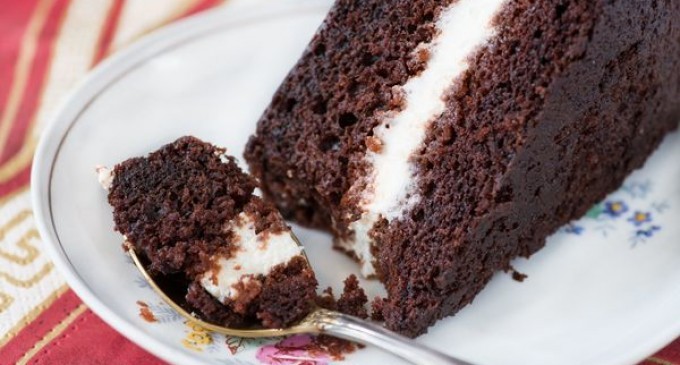
What’s great about this one was it called for marshmallow cream, which I never buy but I knew my youngest would love! This isn’t something I would serve on the regular but to see her face when she tasted a small spoonful; It was amazing!
Ingredients
Cake Batter
2 cups (280 g) all-purpose flour
1 cup (100 g) Dutch-processed cocoa powder
1 1/2 cups (300 g) white granulated sugar
1/2 cup (110 g) dark brown sugar
1 3/4 teaspoon baking powder
1 teaspoon baking soda
1 teaspoon sea salt
3 large eggs
1 cup buttermilk
1/4 cup canola oil
1 cup boiling water
1 tablespoon instant coffee
2 teaspoon vanilla extractFilling
1/2 cup (115 g or 1 stick) salted butter, at room temperature
2 teaspoon vanilla extract or vanilla paste
7 oz (1 tub) store-bought marshmallow creamFrosting
2 cups (230 g) powered sugar, sifted
2 teaspoon light corn syrup
1 teaspoon vanilla extract
1/4 cup whole milk
3 oz dark bittersweet chocolate (~60% cacao preferred)White Squiggle Icing
1 cup (115 g) powdered sugar, sifted
2 teaspoon whole milk
2 teaspoon light corn syrupSpecial Equipment
Tube pan
Sharp serrated knife
Quart freezer Ziplok bagDirections
-
Preheat the oven to 350˚F. Spray cooking oil all over the sides, bottom and center of a tube pan with a removable bottom (the kind you would use for an angel food cake). Place on a rimmed baking sheet.
-
Place the flour, cocoa powder, sugars, baking powder, baking soda and salt in a large bowl. Using a balloon whisk, vigorously stir until the dry ingredients are uniform in color and fully blended. Place the eggs, buttermilk and oil in another bowl and beat together with a fork. In a glass measuring cup place the water, coffee and vanilla extract together and beat with a fork. Make a “well” in the middle of the dry ingredients and pour the buttermilk into the center. Add the hot coffee mixture as well. Fold together until the cake batter forms. Pour into the prepared baking pan (it should only come up to about 1/3 the sides of the pan). Place in the oven and bake for 50-55 minutes or until a toothpick inserted in the middle of the cake comes out clean.
-
Let the cake cool in the pan for at least 3 hours or overnight. When the cake has cooled, make the marshmallow filling by placing the butter and vanilla in the bowl of a stand mixer fitted with the paddle attachment. Beat the butter until the vanilla is incorporated, it becomes creamy and sticks to the side of the bowl. Add the marshmallow cream and beat until well blended.
-
Assemble the cake by first remove the cake from the pan and place it with the rounded side up (the way the cake baked in the pan). Cut a 2-inch by 1-inch rectangle about 2/3rds deep in the middle of one of the sides of cake, following the curve the of the cake. Using the knife lift the rectangle out from the cake. If not enough cake is pulled out, just use the knife to cut and scrape some of it out. You don’t want to cut all the way to the bottom, just about 2/3rds deep. Repeat around the cake, placing the cake pieces right next to where you cut, so you can put them back when the time comes. When you’ve gone all the way around the cake, creating a “moat” or “tunnel” in the cake, spoon in the marshmallow filling about halfway up the carved out center.
- Cut the pieces of cake that you removed, in half lengthwise. Use the portion with the baked side on top and place it over the marshmallow filling with the crust bakes side facing up. Go all away around the cake until the well of marshmallow is completely covered and the cake looks intact. Eat the remaining rough pieces that you trimmed off without your kids seeing!
- Flip the cake over onto a serving platter so that the pieced together part is facing down. For the frosting heat a medium pan over medium heat. Combine corn syrup, powdered sugar, milk and the vanilla stirring continuously until the mixture shines and starts to gurgle around the edges. Turn down heat to your stove’s lowest setting and stir in chocolate until well mixed. Spoon the frosting over the cake while still semi-hot, as it gets colder this will be harder! The frosting dries quickly. You can dip a spatula or a butter knife in warm water to smooth any lumps and bumps.
- For the signature white frosting applied in loops, mix the list of ingredients to make a thicker topping and place the contents in a plastic storage bag. Work the frosting to one corner of the bag and snip the very tip with scissors. Then apply frosting by making a series of connected lower case cursive e’s. My first attempt wasn’t pretty but I just removed it with my spatula and started again!
To save time you could easily buy boxed chocolate cake batter and prepare it as directed on the box and bake it the same way using these baking directions. But I have to say, I think it would be best to make the chocolate frosting from scratch as done here because you want a thinner frosting that dries in a glaze as opposed to the normal store bought frosting.
Fill the cake using this same technique and for the white loopty loop you could easily buy vanilla frosting in the tub and use the same plastic bag tip to apply. I am always looking for shortcuts and now that there are really great dessert options made with real ingredients I feel better about it! I know this called for corn syrup but as I get better at baking, I am determined to find a substitute but for now, everything in moderation right? This was so delicious I didn’t care!
For More Information Please Visit: Eat The Love
Photo Source: 12 Tomatoes.


@[100000075828707:2048:Brooke Gerz]
Yum
Not quite understanding how to remove the cake for making the moat for the filling. Do you cut the section from the SIDE of the cake? Won’t the cake pieces be sticking out after inserting the filling? Not visualizing how the outer edge is smooth after placing pieces of cake back.