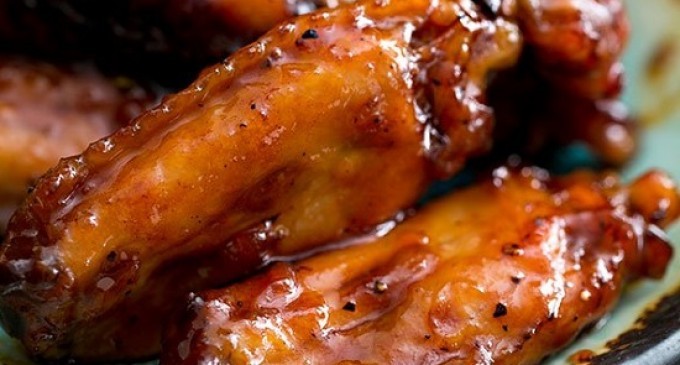
Single segment wing pieces are preferred for this recipe because they are much easier to eat off of as finger food. However, if you do decide to get whole chicken wings make sure to cut the tips of the wings and separate the drumettes because that's what you'll be using.
Let's Get Started…
Ingredients To Gather:
-
2 pounds chicken wings
-
1 Tbsp butter
-
2 Tbsp grated onion (use small hole grater)
-
1/2 cup bourbon whisky
-
3/4 cup maple syrup
-
2 Tbsp tomato paste
-
2-inch sprig fresh rosemary (or 1 teaspoon dry)
-
1/4 teaspoon salt
-
1/4 teaspoon black pepper
The Step By Step Directions To Follow:
1 Make the bourbon maple glaze: Melt butter in a medium saucepan on medium heat. Add the grated onion and cook for 2 to 3 minutes. Add the bourbon whisky, the maple syrup, tomato paste, rosemary, salt and pepper. Whisk to combine. Bring to a low simmer.
2 Coat wings with glaze and arrange on roasting pan: Preheat oven to 350°F. Place chicken wings in a bowl and pour half of the bourbon maple sauce over the wings. Return the remaining sauce to the stovetop. Arrange the wings on an oiled, foil-lined baking pan, with space between each wing.
3 Roast the wings: Roast the wings at 350°F for 20 minutes, then turn the wings over and roast them an additional 12- 15 minutes.
4 Simmer remaining glaze until thickened: While the wings are roasting, simmer the remaining sauce until it thickens slightly and can coat the back of a spoon, then remove from heat.
5 Coat cooked wings in glaze: Remove wings to a bowl and toss with remaining sauce.
Finished!
These wings are messy and finger-licking good so you're going to want to make sure there are napkins, wipes, or a sink nearby when you dig in. A great side to have with the chicken wings are seasoned fries. If you couldn't tell, this is a great finger food meal and it's worth getting messy for. You'll definitely be going back for more. Enjoy!
Article & Photo Source: Simply Recipes


Jamie Barrett
If not now when???This has gone on way,way to many years.
Sarah Pacheco
William Balelo
Haha, Step by step link doesn’t work
Sharing this recipe at httpa://www.facebook.com/homeandgardendigest
Velva Cheek
Sarah Pacheco
Looks good
Yeah Agreed
Interesting post this is really great
Think we will have these today.