Now that you have everything you need let's make sure you have enough space to work. I have a smaller to medium size kitchen but with a hectic schedule, things can become cluttered easily. Once my work space was free of that mess I was able to begin.
PREPARATION
- In a large pot, bring the water, oil, and salt to a boil.
- Add the flour and turn the heat off. Quickly stir the flour until it forms a smooth paste/ball.
- Transfer the dough into a piping bag lined with a star tip.
- Pipe 6-inch spirals onto a sheet lined with parchment paper, starting from the middle and going around in a circle, making sure that there are no gaps between the loops.
- Repeat with the remaining dough.
- Freeze the circles for at least 2 hours.
- Heat oil in a pot over high heat.
- Fry the circles until light golden brown, then drain them on a paper towel.
- Mix the sugar and the cinnamon in a separate bowl.
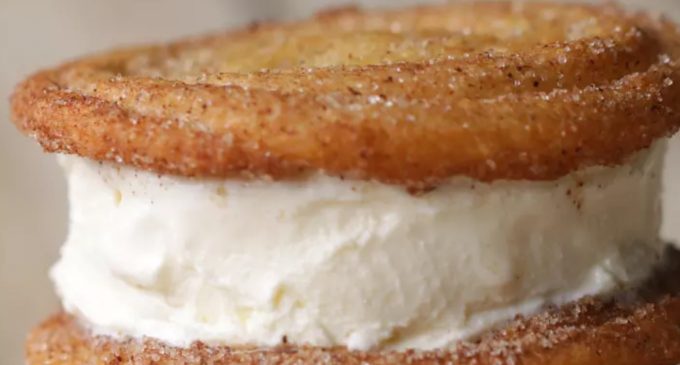
- Coat each churro disc in the cinnamon sugar mix, shaking off any excess.
- Place a scoop of ice cream in between 2 churro discs.
Now you have your sandwich. You can choose to either eat immediately, which I did for the first batch, or you can wrap them up and set them inside the freezer to be enjoyed later. If you do decide to wrap them up there are some tips that you will want to follow. After all, no one wants half melted sandwiches or frost bitten flavor. Here are some of the things you need to pay attention to.
- Freeze your cookies beforehand. When working with homemade cookies, pair them up with cookies of a similar size and sandwich them together with a piece of parchment or wax paper. Place them on a flat surface and freeze. Cold cookies are sturdier than room temperature ones, allowing them to hold up to extra ice cream without bending.
- Assemble cookies in batches. Work in batches of 6-10 sandwiches. Smaller batches ensure that your ice cream won’t be completely melted by the time that you’re done with your assembly line. It is better to put the ice cream back in the freezer before it gets too soft and start the second batch a few hours later.
- Freeze each sandwich as it is assembled. Don’t let just-made ice cream sandwiches sit out for any more time than they absolutely have to. Place them on a parchment or wax paper-lined baking sheet and freeze them on a flat surface. Add subsequent ice cream sandwiches to the same tray. Working in small batches (as above) will ensure that you don’t open the freezer too many times, giving the ice cream a chance to set up.
- Wrap frozen sandwiches individually. Use a piece of wax or parchment paper to wrap each sandwich after it has been individually frozen and is firm. The paper wrapping gives the sandwiches a nicer look than a plastic bag or plastic wrap (though you can use those, as well) and they can be secured with a rubber band. The band will lose its elasticity in the freezer, but it will hold the paper down until you’re ready to eat.
Source: Tasty


Valuable Post
I read this in the Dave Chappell time hater voice
Great view
Yum
Cristy Wilson
Yes please
Nice post !
Samantha Kazarian